This post is based on one more integration project that I worked for Theta (a lot of good challenges happening there, that I can say) where I had to consume an API in the AWS API Gateway with the AWS4 signature enabled as their security mechanism.
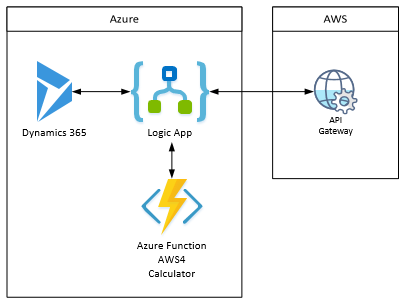
I wanted to do this consumption by using Logic Apps because all my data was coming from Dynamics 365 and I wanted to leverage the Dynamics 365 connector before sending the data to the AWS API Gateway.
The problem is that there’s no complete .Net SDK or API to do that and also, until the time I started this project, there was no connector for AWS in Logic Apps. The only thing I found was an idea at https://feedback.azure.com/forums/287593-logic-apps/suggestions/14911485-integration-with-aws-services that still was under review. So I had to build my own AWS4 signature logic and this is where Azure Function comes into the picture.
Architecture Diagram
Below you can see the logical diagram representing what I wanted to accomplish in this project.

Azure Function – Create AWS4 Signature
As you know, Logic Apps is a workflow that has limited coding options and this signature would require much more code than what Logic Apps is capable of delivering, so I choose Azure Functions to be my helper on this signature process.
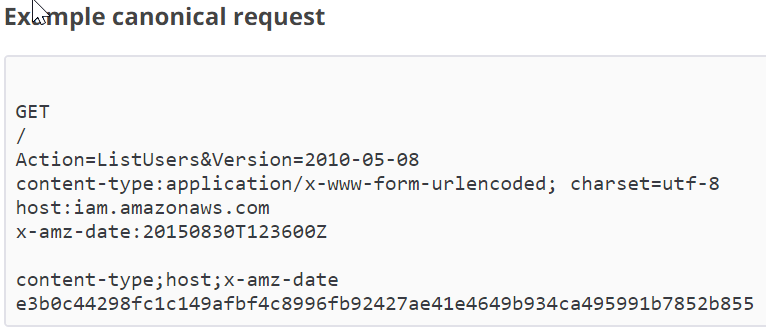
Since the AWS documentation is very well detailed and it contains sample messages with the proper already calculated outputs, I was able to create this complicated process from scratch as you can see in following next sections. The AWS documentation is available at https://docs.aws.amazon.com/general/latest/gr/sigv4_signing.html.
I will not go through the creation of the Azure Function itself since there are plenty of articles about this already. I will just show the code logic that I did for the AWS4 signature.
So, the first thing we need to do is to establish some formats and region definitions as per mentioned in the AWS documentation above.
|
1 2 3 4 5 |
public const string ISO8601BasicFormat = "yyyyMMddTHHmmssZ"; public const string DateStringFormat = "yyyyMMdd"; public const string TERMINATOR = "aws4_request"; public const string REGION = "ap-southeast-2"; public const string SERVICE = "execute-api"; |
And specify dates and datetimes variables using these formats:
|
1 2 3 |
var requestDateTime = DateTime.UtcNow; var dateTimeStamp = requestDateTime.ToString(ISO8601BasicFormat, CultureInfo.InvariantCulture); var dateStamp = requestDateTime.ToString(DateStringFormat, CultureInfo.InvariantCulture); |
Create the canonical message
In the AWS documentation at https://docs.aws.amazon.com/general/latest/gr/sigv4-create-canonical-request.html, it says that the first thing we need to do is to create a canonical request of the message we want to send to the AWS API Gateway. To do so, we need to execute the following steps:
1. As part of the creation of this AWS4 signature, we need a session token that will be embedded in the signature. To create this token, I used the AWSSDK.SecurityToken nuget package with the following code:
|
1 2 3 4 5 6 7 8 9 |
Amazon.SecurityToken.AmazonSecurityTokenServiceClient client = new AmazonSecurityTokenServiceClient(awsAccessKey, awsSecretAccessKey); var stsResponse = client.AssumeRole(new AssumeRoleRequest { DurationSeconds = tokenDuration, ExternalId = string.Format("Dynamics365ToAWS_{0}", DateTime.UtcNow.ToString("yyyyMMddHHmmssZ")), RoleArn = string.Format("arn:aws:iam::{0}:role/{1}", awsAccountId, awsRoleName), RoleSessionName = "Dynamics365ToAWS" }); var token = new stsResponse.Credentials.SessionToken; |
Note that I need to pass a few parameters to get the token. The AccessKey, the SecretAccessKey, the AccountId and the RoleName. You can get this information from your AWS administrator.
2. The next thing to do is to create a hash of the body you want to send in the request to the AWS API Gateway.
|
1 2 3 |
HashAlgorithm hash = HashAlgorithm.Create("SHA-256"); byte[] contentHash = hash.ComputeHash(Encoding.UTF8.GetBytes(jsonContent)); string contenthHashString = ToHexString(contentHash, true); |
3. To make this request, we need to specify the HTTP headers we are going to send. The mandatory ones are listed below but include any other you want to send in the request because AWS will use them to validate your signature.
|
1 2 3 4 5 6 7 |
var headers = new Dictionary<string, string>(); headers.Add("host", new Uri(awsGatewayApiUri).Host); headers.Add("content-type", "application/json"); headers.Add("x-amz-date", dateTimeStamp); headers.Add("x-api-key", awsApiKey); headers.Add("content-length", jsonContent.Length.ToString()); headers.Add("x-amz-security-token", token.SessionToken); |
4. Now that you have all the information above, you can create the canonical hash as the example below.
|
1 2 3 4 5 6 7 8 9 10 |
var canonicalRequest = new StringBuilder(); canonicalRequest.AppendFormat("{0}\n", httpMethod); canonicalRequest.AppendFormat("{0}\n", endpoint.AbsolutePath); canonicalRequest.AppendFormat("{0}\n", string.Empty); //Placeholder for QueryString (Not necessary in this scenario) canonicalRequest.AppendFormat("{0}\n", CanonicalizeHeaders(headers)); canonicalRequest.AppendFormat("{0}\n", CanonicalizeHeaderNames(headers)); canonicalRequest.Append(precomputedBodyHash); byte[] canonicalRequestHash = hash.ComputeHash(Encoding.UTF8.GetBytes(canonicalRequest.ToString())); string canonicalRequestHashString = ToHexString(canonicalRequestHash, true); |
Create the signature
Next, on the documentation, it says to create a string to sign and to calculate the signature. You can check these steps at string to sign and calculate the signature links.
1. Here we used the information obtained earlier to create the string that will be signed for authenticating the request when sending to AWS.
|
1 2 3 4 5 6 7 8 9 10 11 |
string scope = string.Format("{0}/{1}/{2}/{3}", dateStamp, REGION, SERVICE, TERMINATOR); StringBuilder stringToSign = new StringBuilder(); stringToSign.AppendFormat("{0}\n", "AWS4-HMAC-SHA256"); stringToSign.AppendFormat("{0}\n", dateTimeStamp); stringToSign.AppendFormat("{0}\n", scope); stringToSign.AppendFormat("{0}", canonicalRequestHashString); |
2. And now you use the following code to make the calculation of the signature and return the response of the Azure Function.
|
1 2 3 4 5 6 7 8 9 10 11 12 13 14 |
// Compute the signing key var kha = KeyedHashAlgorithm.Create("HMACSHA256"); kha.Key = DeriveSigningKey("HmacSHA256", token.SessionSecretAccessKey, REGION, dateStamp, SERVICE); // Compute the AWS4 signature var signature = kha.ComputeHash(Encoding.UTF8.GetBytes(stringToSign.ToString())); var signatureString = ToHexString(signature, true); // Create the authentication string var authString = new StringBuilder(); authString.AppendFormat("AWS4-HMAC-SHA256 "); authString.AppendFormat("Credential={0}/{1}, ", token.SessionAccessKey, scope); authString.AppendFormat("SignedHeaders={0}, ", CanonicalizeHeaderNames(headers)); authString.AppendFormat("Signature={0}", signatureString); |
Ok, so after some time coding and figuring it out all of this, finally I started to test and to make sure all my code was right using the examples provided in the AWS documentation as the pictures below show.


Logic Apps – Calling the AWS API Gateway
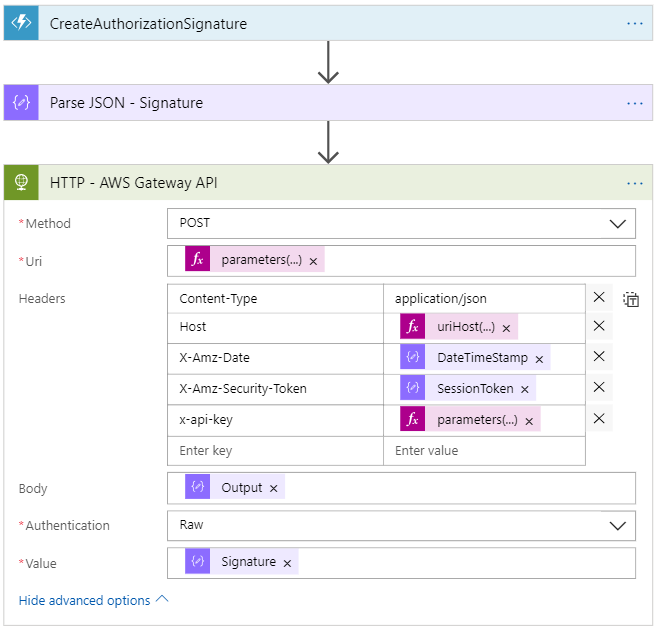
Now that we have the signature done, we can call the AWS API Gateway. To do so, I used an HTTP connector because I didn’t have much reuse. But the best way of reusing this would be to create a custom connector, that I’ll post about soon. Also, another thing that we can do is to configure properly the Open API specification of the Azure Function to avoid all the parsing and composing of JSON that I did. Check the post I did about that at http://www.alessandromoura.com.br/2018/05/18/calling-azure-function-proxy-with-open-api-definition-from-logic-app/.
One thing to be aware is that all the headers and the body content are part of the signature that AWS will use to match the calculation against yours, so make sure you are adding them in the steps above.

Summary
In this post, I show how to use Azure Functions together with Logic Apps when we need to accomplish more complicated tasks that need more coding. And that’s the good thing about the Azure eIPaaS (Enterprise Integration Platform as a Service) platform where we can use several pieces where needed or just stay with the basics where is not needed.
Hope you guys enjoyed the reading and see you around.


